HOME
NEW: Visit my Mustang's Spec Page

Sunday, June 30, 2013

Awaking the Beast

I am absolutely giddy right now.  My buddy Greg came into town this weekend to help me install my new ignition system.  I picked up a Crane Cams HI-6RC Ignition Kit to replace the points distributor in the car.  There are a couple of reasons why I picked up this kit.  First, it is pretty much plug and play and second it comes with a small distributor cap that looks like the one I am replacing.  I'm not a big fan of those large GM style HEI distributor caps, especially if it is going to be front an center as they are on Ford's engines.

Installation diagram


Overall, installation was fairly simple.  The hardest part was deciding where to place the ignition box and coil.  We wanted to put the box inside the cabin, but after pulling out the glove box and center console, there really was no reasonable space to place it.  Some guys online had mentioned putting it inside the glove box, but I wanted to keep that functional.  (On a side note, since the center console was out, I took the time to adjust the stereo knobs so they moved a little bit more freely and didn't bind on the console face anymore.)  So we decided to mount the system on the driver's side inner fender next to the widow washing reservoir.  In order to get the box to mount on the sidewall, we needed to shift the window washer motor a bit closer to the firewall, but after that everything was good.  We also mounted the ignition coil on the driver's side shock tower.

For the distributor, I pulled out the old one without marking the timing, whoops.  That meant we had to remove the valve covers and find top dead center (TDC) on cylinder #1 (front of the engine, passenger side when looking at it from the front).  Once we found TDC, we placed the distributor in the block and snapped everything together.  We also had to cut and crimp on ends to the new spark plug wires and when all the wires were plugged in firing order (1-5-4-2-6-3-7-8), we tried to fire it up.  Damn thing wouldn't fire.  After some troubleshooting, here is your top tip:  The distributor rotates counter-clockwise.  Whoops #2 for me.  Once we fixed that mistake, it fired right up.  We set the initial timing to 8 degrees BTDC and we were good to go.  We took it for a quick test drive and found that it was backfiring like a mothertrucker.  I have been having problems with it running rich, so the next step was to tune the carburetor.


Under Pressure

Just wanted to write a quick post following up on the Chasing Oil Leaks post.  I've been busy with school that I really haven't been able to post and follow-up on it.  I tested the oil pressure and it was up around 60psi.  That is around the high end of normal, so there were some suggestions to try and reduce the oil pressure in the system.  The car did not really have a PCV system in place to relieve the crankcase pressure so the thought was that it would help the engine to put one in.  So I went out and picked up a PCV valve, oil breather, rubber hosing, a set of new valve covers and gaskets.

BEFORE:
Before:  No real PCV system in place

AFTER:
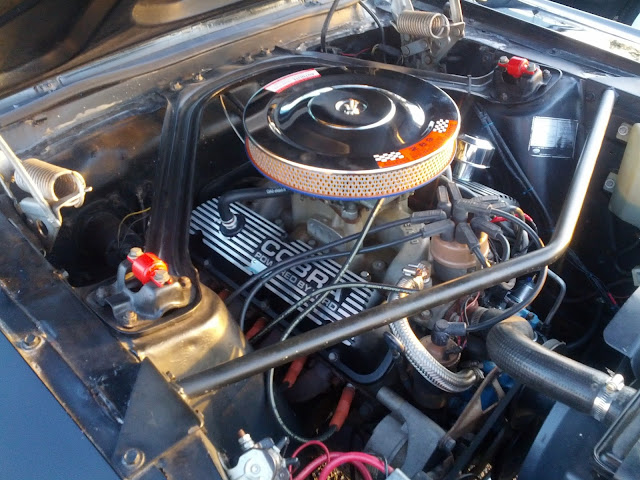
New valve covers with PCV valve going to carb vacuum 


Other side with oil breather connected to bottom of air cleaner


RESULT:
Whelp, pretty much the engine bay looks cleaner.  The new steel/rubber valve cover gaskets fixed the oil leak onto the manifold, but I am still leaking oil under the car.  Pretty much accepted that it is the rear main oil seal and will probably seek out someone to fix that this fall sometime.  But for now, I am going to enjoy the car.  There are some good car shows coming up that I want to go to, and I like that now the car looks more like an original HiPo engine bay.

Sunday, May 19, 2013

Chasing an oil leak (or leaks)

A couple of weeks ago I installed a new oil pan hoping that it was the old multiple piece cork oil pan gasket that was causing the small oil puddles on the garage floor.  I should have known better.  It looks like that is not the issue (I hope) and there is something else going on that I have to chase down.  There is still a leak and I started to notice some clutch chatter so I need to figure this out pretty quickly before I am fixing a clutch (if not more).  Ugh.  There are all kinds of things that can cause this from intake gaskets to valve cover gaskets to oil pan gaskets to rear main oil seals (which I hope it is not).  I need to get this diagnosed.  If anyone has any thoughts feel free to say something in the comments.

The bellhousing is covered in oil as well as the transmission, but this could be cause of several things

Oil is collecting on the intake next to the valve covers on the drivers side

There is all kinds of oil over the fuel pump

The rear of the intake looks dirty, but not all that wet with standing oil.

Thursday, May 9, 2013

Shotgun!

It's finally done, I re-upholstered my front seats:

All done and ready to go


I pulled the seats originally back in March when I started the stereo install.  There was a pretty nasty tear in the passenger side seats, so I got some new foam and upholstery from TMI.  CJ Pony Parts had a sale back in February, so I got them then.  Well March came, and April too, and I never found time to start the seats, so I put them back in the car because the weather was starting to get nice and I needed to drive the car.

Sunday, May 5, 2013

Cobra Oil Pan Install

I took off work on Friday to do some work on the car.  Since my semester ended at school, I wanted to catch up on some of the winter spring projects that I haven't gotten to yet.  First order was installing the Cobra T Oil Pan I picked up from Tony D. Branda from my hometown of Altoona, PA.  I also picked up a new FelPro one-piece oil pan gasket that everyone raves about.  The pins that come with the gasket hold the gasket and the pan on the engine so you can bolt it in.

New 7.5q Oil Pan (stock image)

I followed the instructions from this Mustang Monthly article which made it look easy, but I had a hard time with this one.  The old oil pan was a deep from sump pan and I had to remove the brace, loosen the pitman arm, and remove the starter to get the old pan out.  Since the old pan was a deep sump, I needed to get a new Melling oil pickup from O'Reilly's to fit the new oil pan.

Saturday, April 20, 2013

No Shift Kit

I decided today to get the mustang out of it's winter slumber.  Sure, I still have the front seats to do, but I won't be getting to them in the next couple of weeks so I went ahead and put the front seats back in.  It is just too nice of a day to keep it in the garage, plus I have taken a couple of days off work to do the seats once this semester is done at school.

Time to wake up!

Monday, April 8, 2013

Stereo Install

Well it is officially spring and I have yet to finish any of my winter projects.  I tried really hard to have the JVC work as a trick head unit hid in the glovebox while keeping the stock AM radio in the center console.  I tried to mimic what this guy did with his head unit, but I could not get the JVC unit to fit, it was just too big.  So I did the next best thing and installed it in the truck!

Well it was back to the drawing board with the stereo and I did some more research.  I found the RetroSound Model II stereo and thought I would give it a try.  It is a pretty cool idea to me, a retro looking stereo with all modern functions.  I especially like the Bluetooth streaming that works well with my Android phone.  CJ Pony Parts was having a 30% off sale in March so I picked one of these up.  I also used their nice installation video to get an idea of how to install the stereo:


Monday, January 28, 2013

Winter Projects

I am getting the itch to start my winter projects and boy do I have a bunch of them, but we will see what my time and money allow me to do.

Projects (listed in priority):

  1. Stereo install
  2. Front seat upgrade with 3-point seat belts
  3. New ignition system with points-less distributor
  4. New Shelby oil pan
  5. Modern headlight upgrade
  6. Subframe connectors
Thanks to CJ Pony Parts winter interior sale, I picked up new foam and seat covers for the front seats.  Just waiting on the parts to come in and I hopefully will have some time over my class break to tackle that project (and get seat belts by then).  I've done some research though and converting to 3-point seat belts might be a bit tricky on a '67.

In the meantime, I will work on the stereo install.  I finally have all the parts to put it together.  The one thing though that I am stuck on is how to mount the new head unit in the glove box.  I've done some research and gotten a couple of ideas, but I really don't have a clue how I am going to do this as of right now.  Looks like I need to look into it more.

Can't wait to get this installed and listen to some good tunes!